
The Craymel Cage system explained: all ten Greater Craymels, the two-cage split between Keele and Meredy, opposing elements and summoning rules.
Tales of Eternia Craymel Cage and Greater Craymels
Keele Zeibel and Meredy each carry one Craymel Cage, and those two cages are the entire spell system: put two Craymels into different cages, press Fringe, and you have a new arte. Move one Craymel across the split and the arte is gone. Ten Craymels exist, no arrangement lets a caster use every spell at once, and only one can hold maximum Vitality. Every name, level gate and Vitality figure below is original-release data from PlayStation-era shrine documentation for the 2000 game, because Bandai Namco has published no Craymel table for Tales of Eternia Remastered as of the October 15, 2026 console launch and October 16, 2026 Steam release. The only Craymel wording this version supplies itself is in its achievement list, kept separate below.
- Ten Craymels, three tiers: six Greater, two Governing (Rem, Shadow) and two Supreme (Maxwell, Sekundes).
- Vitality runs 1 to 10. Only one Craymel can sit at 10, and a summon needs its own Craymel maxed.
- Fringe needs both of its component Craymels on opposite sides of the split.
- The original documentation states outright that not all spells can ever be usable at once, so the split is a build decision rather than a checklist.
How Fringing and the Two Cages Work
Neither mage learns spells by character level. A spell exists only as a relationship between two Craymels, and the cages are where you create that relationship.
Official source: Tales of Destiny II game mechanics (RPGClassics shrine, original release)
The rule is explicit: the two Craymels that generate a spell must go into different Craymel Cages, and you press Fringe to create it. Heal needs Undine and Sylph in separate cages. The spell then stays available only while those two are kept apart, which is what catches people out, because the first time you rebalance mid-game, artes you were relying on silently vanish. Vitality is the other half of the screen: a gauge from 1 to 10, shown under each Craymel's name on the Craymel Cage screen. It decides whether you can summon that Craymel, and it moves every time either mage casts anything.
- Vitality rises when a spell of that Craymel's own element is cast.
- Vitality falls when a spell of the opposing element is cast.
- At maximum Vitality, casting that same element again drops the gauge straight to 5.
- No two Craymels can hold maximum Vitality at once; when a second reaches the top, the first falls to 9.
- Meredy's casting moves Keele's Craymels and vice versa, so neither cage can be shielded from the other mage.
If Meredy casts Lightning while Keele holds Volt at maximum Vitality, Volt drops to 5 and Keele loses the summon. Switch off what the AI will waste.
All Ten Craymels and Their Elements
The original guides call all ten of them Greater Craymels with no tier distinction; the class column uses this release's tighter names.
| Craymel | Element | Class in this release | Realm (original release) | Where the pact happens |
|---|---|---|---|---|
| Undine | Water | Greater Craymel of Water | Inferia | Undine Stream, north-east of Morle |
| Sylph | Wind | Greater Craymel of Wind | Inferia | Sylph Cavern, past the Forest of Temptation |
| Efreet | Fire | Greater Craymel of Fire | Inferia | Efreet's Gorge, near Chambard |
| Gnome | Earth | Greater Craymel of Earth | Celestia | Mine of Gnome, past Luishka |
| Celsius | Ice | Greater Craymel of Ice | Celestia | Mt. Celsius, north-west of the mine |
| Volt | Lightning | Greater Craymel of Lightning | Celestia | Ruins of Volt, reached by ship |
| Rem | Light | Governing Craymel of Light | Inferia | Regulus Knoll, south-east of Rasheans |
| Shadow | Darkness | Governing Craymel of Darkness | Celestia | Shadow Cave, underwater in Celestia |
| Maxwell | Elements | Supreme Craymel of Elements | Neither world | Optional fight at the Seyfert Shrine |
| Sekundes | Time | Supreme Craymel of Time | Neither world | Optional EX boss of the original release |
The realm column follows the original release's geography, not any official statement, so read it as older-guide information. Undine Stream, the Sylph Cavern and Efreet's Gorge sit in the Inferia stretch of the old walkthrough, and Rem is fought at Regulus Knoll on the trip back to Inferia. The Mine of Gnome, Mt. Celsius and the Ruins of Volt sit in the Celestia half of that same walkthrough, and the Shadow Cave entry says plainly that its entrance is underwater in Celestia. Community documentation that mirrors this split calls Inferia the realm of Water, Wind, Fire and Light Craymels and Celestia the realm of Earth, Ice, Lightning and Darkness.
Official source: Tales of Eternia Remastered achievement list as catalogued by VGTimes
Official source: Namco Official Guide Book: Tales of Eternia (archive.org scan, original release)
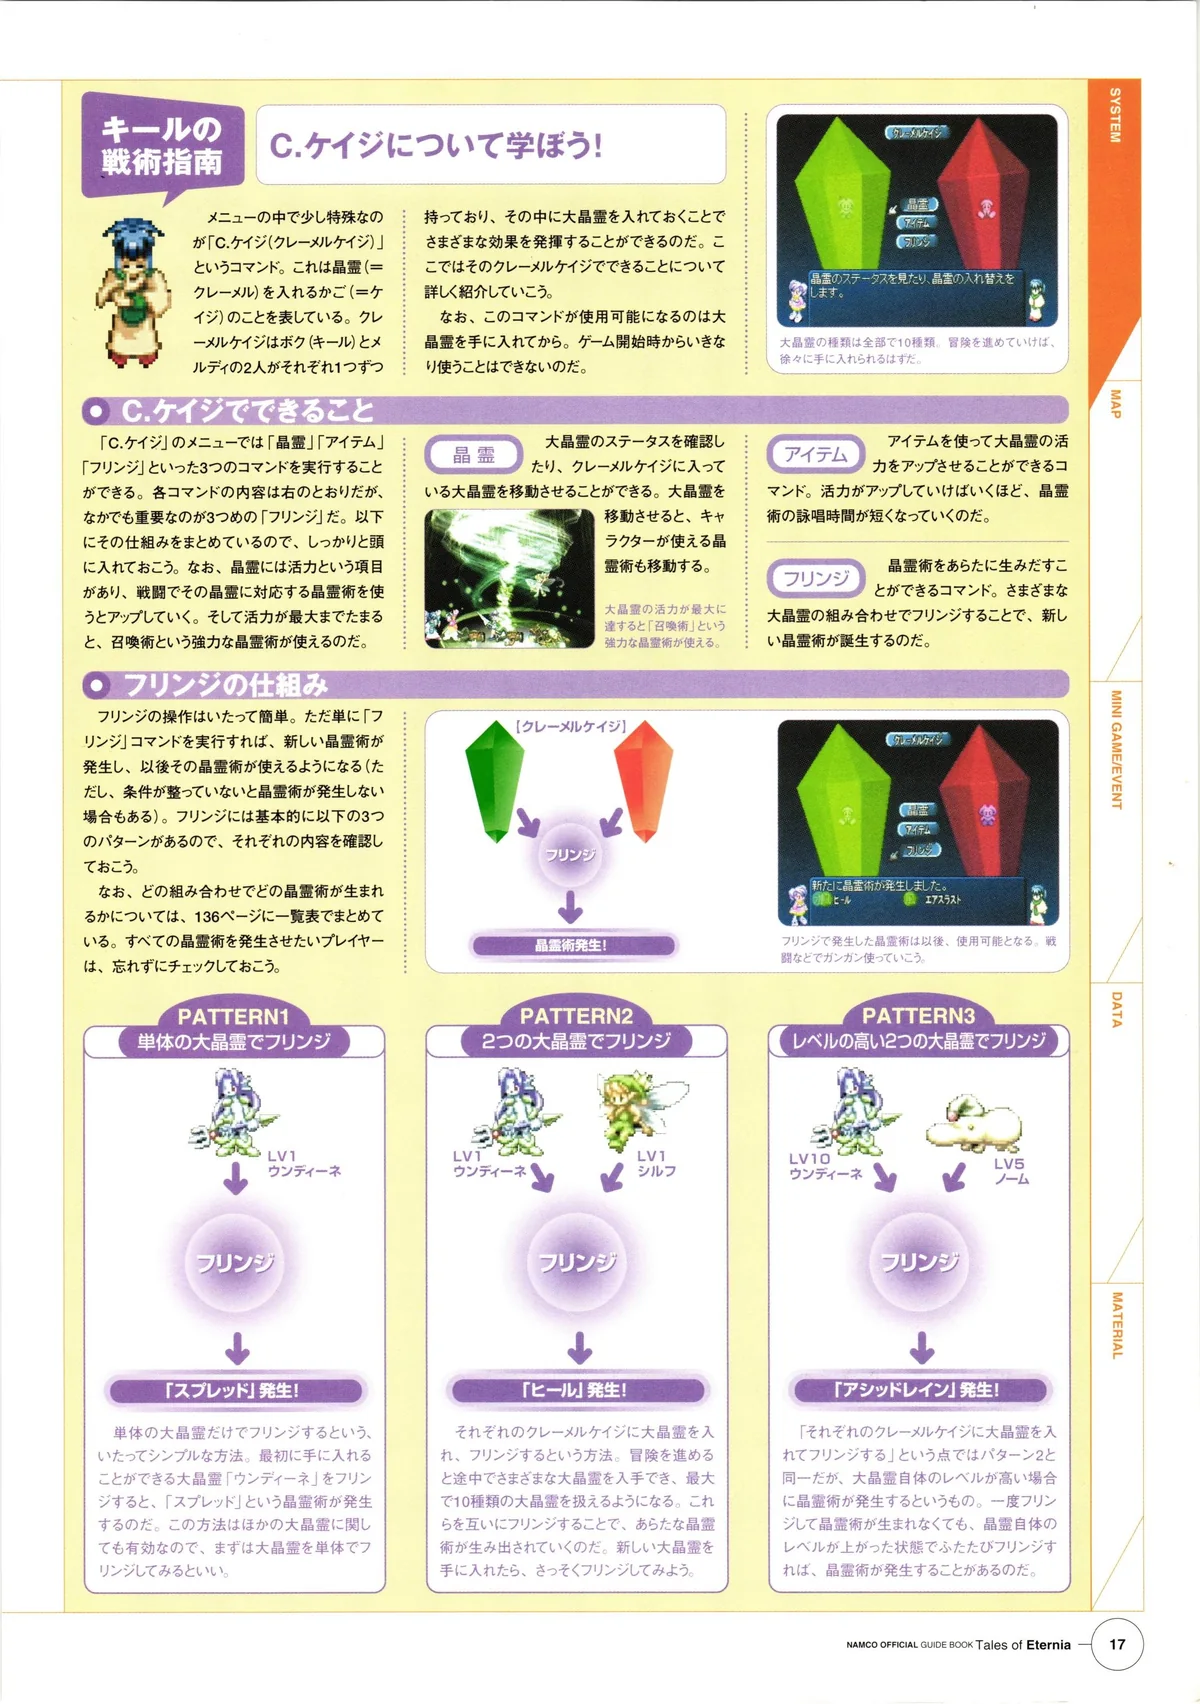
That is the guide book Namco published alongside the 2000 release, and it is the closest thing to an authoritative table the system has ever had. It also shows how little the documentation explains: the cage screen, the Vitality gauge and the Fringe button are described as UI, and the interaction between them is left to the player.
What Every Craymel Gives You on Its Own
Each Craymel has one arte in the original tables whose only listed requirement is that Craymel at level 1. These ten name no partner at all.
| Arte | Element | TP | Requirement in the original table |
|---|---|---|---|
| Spread | Water | 9 | Undine level 1 |
| Air Thrust | Wind | 12 | Sylph level 1 |
| Eruption | Fire | 18 | Efreet level 1 |
| Stalagmite | Earth | 18 | Gnome level 1 |
| Freeze Lancer | Ice | 21 | Celsius level 1 |
| Thunder Blade | Volt | 24 | Volt level 1 |
| Dark Force | Shadow | 32 | Shadow level 1 |
| Ray | Light | 30 | Rem level 1 |
| Meteor Swarm | Elements | 60 | Maxwell level 1 |
| Distortion | Time | 64 | Sekundes level 1 |
Every other spell in the original list names two Craymels, so moving one across the split breaks it. Distortion is the standout: the original table lists it as trapping one enemy for a flat 5,000 damage, and original-release playthrough documentation calls it undodgeable.
The complete list, element by element with every level gate, is on the artes and combos page.
The Five Opposing Pairs
Five pairs define the whole Vitality economy. Casting one side drains the other, so a setup leaning hard on one element is starving its opposite.
| Opposing pair | Remaster naming | Original-guide naming |
|---|---|---|
| Water and Volt | Water and Lightning | Water / Volt |
| Wind and Earth | Wind and Earth | Wind / Earth |
| Fire and Ice | Fire and Ice | Fire / Ice |
| Light and Shadow | Light and Darkness | Light / Shadow |
| Elements and Time | Elements and Time | Elemental / Time |
Because the pairs overlap with the spell requirements, Undine ends up inside Heal, Cure, Restore and Resurrection, while Water's opposite number is Volt. Every Volt spell the other mage casts is therefore a tax on your healing. Absolute, the biggest single-target Ice arte in the original tables, needs Celsius and Volt, which makes Volt both a debuff on Undine and a component of your best nuke. Older community FAQs add that higher Vitality also shortens that element's casting time; the shrine documentation does not carry that detail.
Splitting the Cages: Keele Versus Meredy
The starting artes show how the designers saw the split: each mage begins with three spells, and the two sets divide along the realm line.
| Mage | Starting artes | Elements |
|---|---|---|
| Keele Zeibel | Aqua Edge, Wind Blade, Fireball | Water, Wind, Fire |
| Meredy | Grave, Ice Needles, Lightning | Earth, Ice, Volt |
Keele opens on the Inferia side of the element map and Meredy on the Celestia side, but once you start reassigning Craymels either mage can carry either half, because no spell is tied to a character. The only hard constraint is that each spell's two Craymels end up on opposite sides.
A workable order of operations, based on how the original tables read:
- Fix the support core first. Heal, Cure, Restore and Resurrection all ask for Undine, so Undine's placement sets the health of the build.
- Decide which of Absolute, Indignation, Cyclone or Explode you want, since each spends Volt, Shadow or Rem on damage instead of support.
- Fill in the single-Craymel artes above, which cost no cage space.
- Switch off what the AI will waste. The skills screen disables individual spells for a secondary character, and it is the only defence against a badly timed Volt cast.
The best party setup page covers how the split interacts with which four characters you field, and the battle system page explains what a fringed arte does once the cast starts.
Best Craymel: What Is Worth Building Around
| Pick | Why it earns its cage slot | Requirement |
|---|---|---|
| Sekundes | Distortion deals a flat 5,000 damage and cannot be dodged, and Sekundes is the only Time-tier Craymel | Sekundes level 1, plus Undine 25 for Resurrection |
| Undine | Sits inside Heal, Cure, Restore, Resurrection, Nurse and Acid Rain | Undine plus each arte's partner |
| Volt | The hardest-hitting multi-Craymel artes, and the earliest Thunder Blade | Volt level 1, or Volt plus Celsius for Absolute |
| Rem | The Light tier's only entry, and the partner for Restore, Indignation and Medical+ | Rem level 1 for Ray |
| Maxwell | Opens the Elements tier, and its extension chain is the longest damage sequence the original release documents | Maxwell level 1 for Meteor Swarm |
Third-party trophy trackers give a rough difficulty gradient for the pacts, catalogued 2026-10-17: Undine's Aid at 32.5 percent, Celsius's Aid at 3.3 percent, Sekundes's Aid at 0.5 percent. Those figures track how deep into the game each pact happens, not how strong the Craymel is.
The Craymel Achievements in This Release
The one place this release names Craymels on its own terms is the achievement list: ten pact achievements, one per Craymel, plus a collection entry.
| Achievement | Description as catalogued | Class |
|---|---|---|
| Undine's Aid | Formed a pact with Undine, the Greater Craymel of Water | Greater |
| Sylph's Aid | Formed a pact with Sylph, the Greater Craymel of Wind | Greater |
| Efreet's Aid | Formed a pact with Efreet, the Greater Craymel of Fire | Greater |
| Gnome's Aid | Formed a pact with Gnome, the Greater Craymel of Earth | Greater |
| Celsius's Aid | Formed a pact with Celsius, the Greater Craymel of Ice | Greater |
| Volt's Aid | Formed a pact with Volt, the Greater Craymel of Lightning | Greater |
| Rem's Aid | Formed a pact with Rem, the Governing Craymel of Light | Governing |
| Shadow's Aid | Formed a pact with Shadow, the Governing Craymel of Darkness | Governing |
| Maxwell's Aid | Formed a pact with Maxwell, the Supreme Craymel of Elements | Supreme |
| Sekundes's Aid | Formed a pact with Sekundes, the Supreme Craymel of Time | Supreme |
| Gathering the Greats | Collect all Greater Craymels | Collection |
This release therefore does separate Greater, Governing and Supreme Craymels, even though the original guides used one label for all ten. Every pact achievement is Bronze and flagged as secret, so the list will not tell you where to go.
Official source: Tales of Eternia Remastered on Steam
What the Remaster Changes Around the Cage Screen
No official change-list entry mentions Craymel balance, cage capacity, Vitality behaviour or the Fringe rule, and no Craymel table has been published for this release.
| Addition | What it does for a cage build |
|---|---|
| Destination icons | A yellow exclamation icon marks main-scenario destinations and a blue one marks events where new techniques and skills are learned, signposting Craymel lairs |
| Green text highlight | Newly learned techniques and skills display in green, making it obvious when a Craymel level unlocked something |
| Help and Tips | A Help entry under Menu > Custom explains in-game terminology, and rotating tips explain systems as you play |
| Disable encounters | Random encounters can be switched off, making a revisit to an old Craymel lair far less tedious |
| Battle Retry | Added for regular battles, so it is not a safety net for a Supreme Craymel fight |
| Nereid's Labyrinth timing | The dungeon the original opened only from cleared save data now unlocks during the first playthrough at Balir Castle |
Official source: Everything new in Tales of Eternia Remastered (Bandai Namco Europe official news)
Official source: Remastered change list (Bandai Namco official site)
Official source: Tales of Eternia Remastered (Bandai Namco official game page)
This release makes the Craymel system easier to navigate and easier to grind, and leaves the system itself alone. The original versus Remastered page tracks what has actually been confirmed about the differences between versions.
FAQ
Is there a best Craymel in Tales of Eternia? By the original tables, Sekundes, mostly for one spell. Distortion needs only Sekundes at level 1, deals a flat 5,000 damage and cannot be dodged, so it survives any cage reorganisation. Undine matters more in practice, since it is a component of Heal, Cure, Restore, Resurrection and Nurse, but its value depends on keeping partners in the right cages.
Can I use every Craymel arte at once? No, and it is a design decision rather than a limitation you can grind past. Every multi-Craymel spell needs its components on opposite sides of the divide, the requirements overlap heavily, and the original documentation states not all spells will ever be usable at once.
Why did my summon disappear? Almost always because the other mage cast something. The gauge is shared between Keele and Meredy, so a Lightning cast from Meredy's side drags Keele's Volt down, and a second Craymel reaching maximum pushes the first to 9. Switching the offending spell off on the AI-controlled mage is the fix.
Does the remaster have the same ten Craymels? Every Craymel name this release uses matches the original list, and its achievements name all ten with the same elements, so there is no evidence of a roster change. The level gates may not be identical: the remaster is understood to be built from the PSP port rather than the 2000 PlayStation original, and no Craymel table has been published for either.
Related Guides
- Tales of Eternia Artes List and Combo Guide - the full spell list with every TP cost and Fringe requirement.
- Tales of Eternia Best Party Setup and Team Builds - which four characters to field, and how the cage split constrains them.
- Tales of Eternia Remastered Battle System Guide - what a fringed arte does once casting begins.
- Tales of Eternia Leveling and Gald Farming Guide - where to grind out the Craymel levels behind the better fringes.
- Tales of Eternia Remastered Beginner Guide and Tips - the systems to learn first if the cage screen is what confused you.
More Tales of Eternia Remastered Guides
How the combat levels work in Tales of Eternia Remastered: what is selectable from hour one, what unlocks on a second playthrough, and where to change it.
Reid's Eternal Sword, Farah's Omni Weapon and the six-piece legendary set behind Legendary Arsenal, plus armour, accessories and Gald priorities.
The Glimmer Spire floor by floor, the solo Valkyrie fight on the top level, and how the remaster opens Nereid's Labyrinth on a first playthrough.
Optional and EX bosses in Tales of Eternia explained and separated: Sekundes, Wraith Horus and Valkyrie, where each one lives and what each rewards.
HowLongToBeat has no remaster times yet; the 2000 original averages 33 hours for the story, 42 with sides and 73.5 hours for full completion.
Tales of Eternia Remastered holds a 76 Metascore: what reviewers praise, the 2D combat split, the Switch stick problem, and who should buy at $29.99.
Tales of Eternia leveling and Gald farming: Boost's experience and encounter dials, when grinding pays, and the mid-game buys worth saving for.
Every Tales of Eternia minigame and where to find it: the Rasheans river race, Craymel Ball, Chamballoon, the stone game and the cooking contest.